Hei hyvät foorumin käyttäjät.
Pyydän anteeksi suomeani. Käänsin nämä tekstit Google-kääntäjällä. Puhun saksaa, englantia ja venäjää. Alla on alkuperäinen tekstini englanniksi, jos kääntäjä käänsi sen väärin.
Haluaisin esitellä itseni, nimeni on Aleksei. Asun ja työskentelen Saksassa ja olen ammattimaisesti mukana todellisen liikkuvan kaluston kehittämisessä (työskentelen Siemensissä tehonmuuntimen kehitysosastolla).
Mallirautatie on minun harrastukseni. Olen kehittänyt tämän SM2-sähköjunan mallin, tällä foorumilla hyvin tunnetun sähköveturin SR1 ja dieselveturin DV17.
Valitettavasti löysin SM2-mallin suunnittelussa joitain virheitä. Puolustukseksi voin vain sanoa, että tein mallin valokuvista ja materiaaleista, jotka sain digitaalisessa muodossa; Itse en ole nähnyt näitä junia. Olen valmis tekemään nämä korjaukset ja tekemään uusia muotteja, mutta minun on tiedettävä, kuinka moni on valmis mahdollisesti ostamaan mallin. Jos olet kiinnostunut, kirjoita minulle täällä tai yksityisviestillä.
Lisäksi olen erittäin tyytymätön siihen, että junan alla olevista laitteist on käytännössä olematon. Joten jos joku teistä, jotka ovat kiinnostuneita tällaisesta mallista, voi ottaa kuvia junan alla (esimerkiksi olet töissä varikolla tai sinulla on ystäviä, jotka työskentelevät varikolla), täydentän mallia mielelläni alla olevista laitteist, koska malli nykyisessä muodossaan näyttää minusta keskeneräiseltä. Jos sinulla on muita toiveita mallin suhteen, olen valmis ottamaan ne huomioon.
Ystävällisin terveisin Aleksei Nevinskii
Hello, Dear forum users.
I apologize for my Finnish. I translated this text with the Google-translator. I speak German, English and Russian. Below is my original text in English, if the translator translated it incorrectly.
I would like to introduce myself, my name is Aleksei. I live and work in Germany and am professionally involved in the development of real rolling stock (I work at Siemens in the power converter development department).
Model railways are my hobby. I am the developer of the models of this model of electric train SM2, the well-known on this forum electric locomotive SR1 and diesel locomotive DV17.
Unfortunately, I found some errors in the design on SM2 model. In my defense, I can only say that I made the model from photographs and materials that I could obtain in digital form; I myself have not seen these trains. I'm willing to make these corrections and make new molds, but I need to know how many people are willing to potentially buy the model. If you are interested, please write me here or in personal messages. In addition, I am very dissatisfied with the fact that the train's under-coach equipment is practically non-existent. So, if any of you who have an interest in such a model can take photos under the train (for example, you work in the depot or have friends who work in the depot), I would be happy to complete the model with the under-coach equipment, since the model being in the form in which it is now now, seems unfinished to me. If you have any other wishes regarding the model, I am ready to take them into account.
Sincerely, Aleksei Nevinskii
Sm2-sähkömoottorijuna
Valvojat: jhr, Hermanni
-
LOK
- Lämmittäjä
- Viestit: 217
- Liittynyt: 19.10.2015 21:42
Re: Sm2-sähkömoottorijuna
Hi Aleksei,
Welcome to our forum! That was a pretty good machine translation to our exotic language!
I don't have images about the underframe/chassis of Sm2, but have you already visited Vaunut.org? That website is dedicated for railway pictures about Finnish trains. The webpage is (almost completely) in Finnish only, but I could give you at least a few links to the webpage's search results for images about the Sm2 trains.
Currently, there is around 2300 images about the Sm2 trains. Here is a link to the search results where you can browse the images: http://vaunut.org/kuvat/?tag0=4%7CSm2%7C . Unfortunately, Vaunut.org search function cannot be used to find images from specific parts of the subject so finding chassis-related images needs to be done manually from the search results.
I was able to find at least a few images where the chassis is visible. Here are some links to photos you may find interesting if you currently have next to no images available for the Sm2+Eioc chassis:
http://vaunut.org/kuva/121577 (motorized part of Sm2 train)
http://vaunut.org/kuva/17442 (This image is actually Finnish State Railways' photo + technical drawing of Sm2, showing some of the details found in the chassis.)
http://vaunut.org/kuva/33047 (non-motorized Eioc wagon part of Sm2 train)
Hopefully you find these pieces of information helpful.
Cheers,
LOK
-
Aleksei
- Matkustaja
- Viestit: 7
- Liittynyt: 11.02.2024 19:27
Re: Sm2-sähkömoottorijuna
Hello LOK,
Thanks for the invitation!
It's great that you write in English. Then I will also answer in English.
Thank you very much for the links to the site. I reviewed a long time ago all the photos on this site and it was actually one of the main sources of materials when I created this model.
For clarity, I compare three-dimensional renderings of the model with photographs. I took photos from the site Vaunut.org.
Actually, additional photos from this site served as a source of information for me to find errors, of which there are currently 3:
1. The connecting seam should not go through the entire roof, but only in the corrugation area. 2. The undercar frame has a different shape. 3. The inter-car cable on the trailer car has a different connection niche. But on this site, unfortunately, there is not a single photo under the train. The bottom of the model, as you can see, is almost empty, which is a shame... Have a nice weekend!
With best regards,
Aleksei
Sinulla ei ole tarvittavia oikeuksia nähdäksesi tämän viestin liitetiedostoja.
Viimeksi muokannut Aleksei, 14.03.2024 00:06. Yhteensä muokattu 1 kertaa.
-
PeS
- Veturinkuljettaja
- Viestit: 954
- Liittynyt: 17.12.2007 10:03
Re: Sm2-sähkömoottorijuna
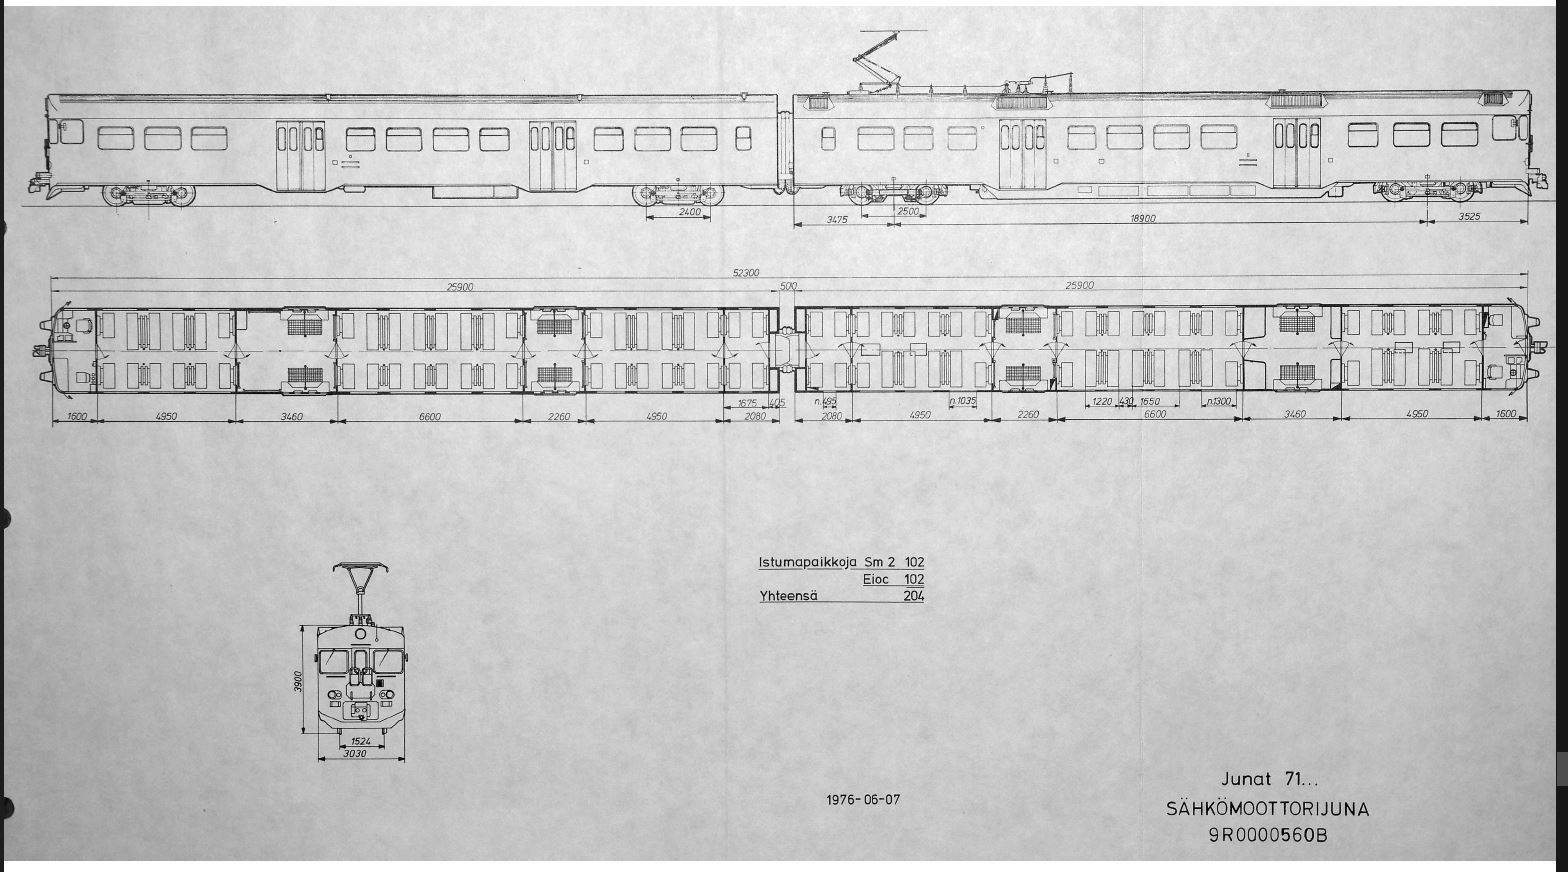
Aleksei, I hope that this might helps you.
Best Regards,
Petri Sallinen
Best Regards,
Petri Sallinen
-
LOK
- Lämmittäjä
- Viestit: 217
- Liittynyt: 19.10.2015 21:42
Re: Sm2-sähkömoottorijuna
A person who is following this forum sent me an image he had taken some years ago from a retired Sm2 6063. According to the image (below), the shape of the underframe is the same as in PeS's technical drawing.
I did some extra search in Vaunut.org, and found another picture of Sm2's chassis around the door area. Sm2 6081 seems to have similar underframe as Sm2 6063. Link to the image of Sm2 6081: http://vaunut.org/kuva/132762
It seems that there are at least two different chassis types in Sm2 trains: Frames with slanted underframe endings, and frames with straight endings as highlighted in Aleksei's photo. I presume the slanted endings are the original ones used in Sm2 trains. Some Sm2 trains have then received new frames during renovations, but not all. This makes modeling of modernized Sm2 trains quite a puzzle now...
According to the attached photo I received, the large underframe beams seem to be deeper under the wagon unlike they are currently drawn in the 3D model. It looks like the beams are located right above the rails. I also found a video about Sm2 trains which also suggests that the beams are deeper under the wagon. Link to Youtube video (check from 2:50 onwards for clips from the chassis): https://www.youtube.com/watch?v=dtdzcmVmWpQ
I also found an image which reveals where the pressure vessels are roughly located in Eioc wagons of Sm2 trains. Link: http://vaunut.org/kuva/126626
- LOK
EDIT 24.2.2024: Removed one unclear sentence.
Sinulla ei ole tarvittavia oikeuksia nähdäksesi tämän viestin liitetiedostoja.
Viimeksi muokannut LOK, 24.02.2024 23:57. Yhteensä muokattu 1 kertaa.
-
Aleksei
- Matkustaja
- Viestit: 7
- Liittynyt: 11.02.2024 19:27
Re: Sm2-sähkömoottorijuna
Dear Petri,
thank you for this answer. I also used this drawing, but it has some inaccuracies.
The first difference is the undercar frame. In the drawing it is parallel to the rail and has no slopes. The second inaccuracy is the driver's cab window. It is very wide in the drawing. Unfortunately, I didn’t notice this right away and had already made the sides of the cars with wide windows. At first I hat a hope that maybe the windows were narrowed after modernization of the trains, but after checking of old photographs I saw that even the red-and-yellow trains already had narrow windows. Maybe, of course, the very first SM2-trains had such an undercar frame and window in the driver’s cab, but I didn’t found any photos where this can be seen... In the same time the wide windows and underframes are very noticeable visually. About underframe I already wrote in my last message, and regarding windows, after I milled the sides, it was necessary to mill and glue the inserts, as shown in the picture: Dear LOK,
thank you for the photo from your familiar from the forum. With this photo everything became even more unclear May be he has any more such detailed photos?
According to the photographs of your familier and the photo that you found, whether understand i correct these structures are located only under the first doors of the motor car? If this is the case, then I will try to add them to the model. In the photo from "Vaunut" you found, by the way, it is possible to see some kind of cylinder right behind the cowcatcher. I can add this cylinder too.
Regarding the photograph of the vessels, unfortunately, it is absolutely impossible to say how deep these vessels hang. In addition, the photo was taken at a very high angle. I will try to arrange them, but I can’t say how accurately it will be...
thank you for this answer. I also used this drawing, but it has some inaccuracies.
The first difference is the undercar frame. In the drawing it is parallel to the rail and has no slopes. The second inaccuracy is the driver's cab window. It is very wide in the drawing. Unfortunately, I didn’t notice this right away and had already made the sides of the cars with wide windows. At first I hat a hope that maybe the windows were narrowed after modernization of the trains, but after checking of old photographs I saw that even the red-and-yellow trains already had narrow windows. Maybe, of course, the very first SM2-trains had such an undercar frame and window in the driver’s cab, but I didn’t found any photos where this can be seen... In the same time the wide windows and underframes are very noticeable visually. About underframe I already wrote in my last message, and regarding windows, after I milled the sides, it was necessary to mill and glue the inserts, as shown in the picture: Dear LOK,
thank you for the photo from your familiar from the forum. With this photo everything became even more unclear
According to the photographs of your familier and the photo that you found, whether understand i correct these structures are located only under the first doors of the motor car? If this is the case, then I will try to add them to the model. In the photo from "Vaunut" you found, by the way, it is possible to see some kind of cylinder right behind the cowcatcher. I can add this cylinder too.
Regarding the photograph of the vessels, unfortunately, it is absolutely impossible to say how deep these vessels hang. In addition, the photo was taken at a very high angle. I will try to arrange them, but I can’t say how accurately it will be...
Sinulla ei ole tarvittavia oikeuksia nähdäksesi tämän viestin liitetiedostoja.
-
LOK
- Lämmittäjä
- Viestit: 217
- Liittynyt: 19.10.2015 21:42
Re: Sm2-sähkömoottorijuna
I received the following pictures with instructions from which side of the Sm2 train the images were taken. It looks like the underframe in side 1 and 2 are not mirror images of each other.Aleksei kirjoitti: ↑24.02.2024 18:22 Dear LOK,
thank you for the photo from your familiar from the forum. With this photo everything became even more unclear
According to the photographs of your familier and the photo that you found, whether understand i correct these structures are located only under the first doors of the motor car? [...]
Let's look the previously attached door image one more time (image 1): The door in image 1 is actually the door which is at the rear of Sm2 unit, away from the cab. This side of the train has not been drawn in PeS's technical drawing. I personally thought that this image was representing the door near the cab because there is a similar round cylinder on the right side of the door as seen in PeS's drawing. That was not the case after all.
Image 1: The rear door area of Sm2 6063. The cab of Sm2 is on the left and Eioc part of the train is on the right.
Image 2 represents the cab-side door of Sm2 6063. Again, this photo is taken from the side which is not drawn to the technical drawing.
To my eyes, it looks like the underframe protrudes towards the cameraman from the area which contains hatches for electrical equipment and/or brake systems. If this is true, it would explain why the underframe is drawn parallel to the rails in the technical drawing - except from the end parts where the frame raises towards the wagon floor.
Last picture (image 3) I received illustrates the underframe of Eioc 6263. This picture is also taken from the side which is not shown in the technical drawing. The photo does not tell how far away (deep) from the walls the pressure vessels are located, but it reveals how far away from the doors the vessels are. The underframe box structure is also visible, thou the covers seem to be missing from the box. This retired train was used as a spare part source for the remaining Sm2 trains.
EDIT 28.2.2024: typo
Sinulla ei ole tarvittavia oikeuksia nähdäksesi tämän viestin liitetiedostoja.
Viimeksi muokannut LOK, 28.02.2024 21:26. Yhteensä muokattu 1 kertaa.
-
Aleksei
- Matkustaja
- Viestit: 7
- Liittynyt: 11.02.2024 19:27
Re: Sm2-sähkömoottorijuna
Hello together,
Thank you very much for the very valuable photos!
For clarity, I compare three-dimensional renderings of the model with photographs. I took photos from the site Vaunut.org.
At the moment I have placed the vessels, it seems to me, more or less correctly. It turned out that the drawing that was published above on the undercarriage equipment of the trailer car does not coincide at all, so unfortunately all under frame of the trailer car will be necessary to mill again. The arrangement of vessels and the depth of the box were carried out by comparing photographs with the model, taking into account the transformation of perspective. This gives a less accurate result than projection photographs (for example, as one from LOK from the last post), and it is much more tedious, but it can also be used.
Main vessel on the motor car: Projection photo: Perspective photo. On the left, to the left of the box under the carriage, there is something else. This is most likely the brake cylinder. If so, then it should be located approximately along the longitudinal axis of the car. I haven't done it yet. Regarding the frame of the motor car in the area of the doors - I’m still doing it. I think I’ll show the next result not earlier as this weekend.
With best regards,
Aleksei
Sinulla ei ole tarvittavia oikeuksia nähdäksesi tämän viestin liitetiedostoja.
Viimeksi muokannut Aleksei, 14.03.2024 00:07. Yhteensä muokattu 1 kertaa.
-
Aleksei
- Matkustaja
- Viestit: 7
- Liittynyt: 11.02.2024 19:27
Re: Sm2-sähkömoottorijuna
Hi all!
For clarity, I compare three-dimensional renderings of the model with photographs. I took photos from the site Vaunut.org.
I worked on the model a little more. I implemented everything that I was able to see additionally in the photographs that you provided me.
Please see what it looks like now.
The left and right frames under the doors seemed completely symmetrical to me: Here I also added a cylinder, which is visible under the cabin: After comparing more photographs, I came to the conclusion that here I initially drew the cylinder very short. I lengthened it and now it looks like this: The arrangement of equipment under the body looks like this: Thank you for your interest and I look forward to your comments and, if possible, additional materials.
With best regards,
Aleksei
Sinulla ei ole tarvittavia oikeuksia nähdäksesi tämän viestin liitetiedostoja.
Viimeksi muokannut Aleksei, 14.03.2024 00:08. Yhteensä muokattu 1 kertaa.
-
LOK
- Lämmittäjä
- Viestit: 217
- Liittynyt: 19.10.2015 21:42
Re: Sm2-sähkömoottorijuna
Some comments for the latest 3D model modifications:
I did some exposure adjustment to one of the previously shown images (below). The shape of the steel bar that connects the bottom of the main underframe structure to the walls is now more visible. The connecting bar seem to be either L-profile bar or square-profile bar, maybe something like 5 x 5 cm in cross section.
The linked image also verifies that the underframe actually drops closer to the rails in the area between the doors. This "drop" is indeed missing from the technical drawing as it was discussed previously.
https://www.youtube.com/watch?v=FtNFsiFfgNg
I did some exposure adjustment to one of the previously shown images (below). The shape of the steel bar that connects the bottom of the main underframe structure to the walls is now more visible. The connecting bar seem to be either L-profile bar or square-profile bar, maybe something like 5 x 5 cm in cross section.
I agree that the main shape of the underframe in Sm2 unit is symmetrical on the side which is not drawn on PeS's technical drawing. However, the underframe is not symmetrical on the side which is showcased in the drawing: As illustrated in the drawing, the underframe does not raise in a stepwise manner on the rear door's end due to the large pressure vessel. There is also an image in Vaunut.org which shows what that area looks like - or looked like before the renovations: http://vaunut.org/kuva/14175
The linked image also verifies that the underframe actually drops closer to the rails in the area between the doors. This "drop" is indeed missing from the technical drawing as it was discussed previously.
I found a Youtube video which shows that there are even more boxes under Sm2 and Eioc units. The details are visible in the video from 0:30 onwards and there is no perceptive messing up the placements of the details. Very good video for model builders despite a platform, fence and shadows are still hiding some of the things.
Sinulla ei ole tarvittavia oikeuksia nähdäksesi tämän viestin liitetiedostoja.
-
Aleksei
- Matkustaja
- Viestit: 7
- Liittynyt: 11.02.2024 19:27
Re: Sm2-sähkömoottorijuna
Dear Lok,
thank you very much for your answer, as usual, detailed and useful!
Yes, I also noticed that the structure under doors is not solid, but are beams, both on the left and on the right sides. But, unfortunately, in the scale it will be very thin and I’m not sure that such a beam will possible to do in HO-Scale. If you look at my renderings from the very beginning of this thread, you will notice that the walls of the cars are thick, and the sides of the frame of the motor car are also thick. This was all done because with fine-grained technologies the part will either begin to distort or break. But I will definitely try to make these beams thin, like in the photo, or as thin as possible. I can’t promise, however, that the result will be successful...
As for the rear part of the motor car frame, I have already fixed that before. But in your photo before train reconstruction there is an angle of approximately 40 degrees, and in the photo in my post above there is an angle of 90 degrees. Unfortunately, I don't know whether this depended on the reconstruction of the train, or on what the serial number of the train was. But I will do it according to your wish. Which option do you want, 45 degrees or vertical?
I watched the video, thanks! Yes indeed, a very useful video! But, unfortunately, I can’t add anything additional to the model based on it... We see that immediately behind the bogie there is some kind of completely incomprehensible:) but apparently very thin-walled structure, which I can’t imagine at all. If you can show it in more detail, that would be great. Most likely, this volumetric structure shall be made by photo-etching... Next is the vessel and box, which I already show on in past posts (thanks to your past efforts in finding photos again). Then comes the following another incomprehensible design again, which I already wrote about on February 27, only now I doubt that this is a brake cylinder, since it is not clear what two petals hang down. The second vessel is not visible. This is good, it means it is hiding behind the door overhangs, and with the help of isometric comparison I probably determined his position even more or less correctly. And then, at the beginning of the motor car, the video is replaced by another.
Please write, do you think you can provide more materials, or will we stop there for now? If you want, I can draw some “kind of fable” in place of these two incomprehensible structures, but personally, in my opinion, it is better to leave these places empty. If in the future we find out what it is, I’ll better make these parts and you can glue them onto the model yourself later.
Now, of course, we have missing parts, but you and I managed to overcome important inconsistencies, which, alas, have already been machined and cast. This I will do again.
It is a pity of course, that the structure of the bottom also remains unclear; it is completely flat on the model, which spoils the impression of the model if you turn it over.
With best regards,
Alexey
thank you very much for your answer, as usual, detailed and useful!
Yes, I also noticed that the structure under doors is not solid, but are beams, both on the left and on the right sides. But, unfortunately, in the scale it will be very thin and I’m not sure that such a beam will possible to do in HO-Scale. If you look at my renderings from the very beginning of this thread, you will notice that the walls of the cars are thick, and the sides of the frame of the motor car are also thick. This was all done because with fine-grained technologies the part will either begin to distort or break. But I will definitely try to make these beams thin, like in the photo, or as thin as possible. I can’t promise, however, that the result will be successful...
As for the rear part of the motor car frame, I have already fixed that before. But in your photo before train reconstruction there is an angle of approximately 40 degrees, and in the photo in my post above there is an angle of 90 degrees. Unfortunately, I don't know whether this depended on the reconstruction of the train, or on what the serial number of the train was. But I will do it according to your wish. Which option do you want, 45 degrees or vertical?
I watched the video, thanks! Yes indeed, a very useful video!
Please write, do you think you can provide more materials, or will we stop there for now? If you want, I can draw some “kind of fable”
Now, of course, we have missing parts, but you and I managed to overcome important inconsistencies, which, alas, have already been machined and cast. This I will do again.
It is a pity of course, that the structure of the bottom also remains unclear; it is completely flat on the model, which spoils the impression of the model if you turn it over.
With best regards,
Alexey
-
LOK
- Lämmittäjä
- Viestit: 217
- Liittynyt: 19.10.2015 21:42
Re: Sm2-sähkömoottorijuna
Hi Aleksei!
I have not received any extra photos of Sm2 trains so I presume I'm not able to provide more information about the chassis.
I was not planning to buy a complete H0-Sm2, but I'd be interested to buy bogie facades, pantographs, rooftop's detail parts and decals if you start producing this model. I could then build my own H0-Sm2 with the help of those parts one day.
We could discuss about the prices etc. via Veturitalli.Fi's private message system. You can access it from the upper right corner of this webpage by clicking "Yksityisviestejä" link. The link is visible when you have logged in. There should be at least one message waiting for you.
Cheers,
LOK
P.S. If there are forum members who would like to share their own images on this thread but are struggling to attach images here, I can assist with scaling, cropping and image formats if needed. And the same in Finnish:
P.S. Jos täällä on foorumilaisia, jotka haluaisivat avustaa Alekseita omilla valokuvillaan mutta kuvaliitteiden lisäys ketjuun ei onnistu, niin voin auttaa kuvien skaalauksen, rajauksen ja kuvaformaattimuunnosten kanssa. Minut tavoittaa foorumin yksityisviestillä.
-
LOK
- Lämmittäjä
- Viestit: 217
- Liittynyt: 19.10.2015 21:42
Re: Sm2-sähkömoottorijuna
I watched several Youtube videos about Sm2 trains (can be found with search words "Sm2 juna") and I took screenshots when the end sections of the chassis were visible. I adjusted exposure time of the screenshots to highlight the areas of interest, and I could not find any Sm2 train which would surely have 90 degree frame endings. I noticed from the videos thou that the slanted endings start to look like 90 degree endings when the image is taken in a low degree angle like in your previous image:Aleksei kirjoitti: ↑08.03.2024 23:12 As for the rear part of the motor car frame, I have already fixed that before. But in your photo before train reconstruction there is an angle of approximately 40 degrees, and in the photo in my post above there is an angle of 90 degrees. Unfortunately, I don't know whether this depended on the reconstruction of the train, or on what the serial number of the train was. [...]
Could it be so that the 90 degree chassis endings are an optical illusion? I took most of my examples from this lengthy video:
Esittelyssä: Sm2 [200 tilaajan spesiaali] | In present: Sm2 [200 subscriber special] (from Suomen Junia)
Link: https://www.youtube.com/watch?v=chsqGQuco_k
-
Aleksei
- Matkustaja
- Viestit: 7
- Liittynyt: 11.02.2024 19:27
Re: Sm2-sähkömoottorijuna
Hello, LOK
Thank you very much once again for your answers and support!
I will be possible to receive necessary parts when they are ready, but it will still take some time, since I want to try out the use of a new technology for myself – stereolithography, I hope, it will be possible to make roof smoother, as it is now, after machining and make fine parts better as well. If the result is successful, you will see it here first.
Regarding to Pantograph, i designed the model for Sommerfeldt art. nr. 944.
For now, I am finishing up adding to the model and your videos and advice on finding videos using the right keywords have helped me a lot. I was able to add a lot of things or move them.
Look what I got as a result:
For clarity, I compare three-dimensional renderings of the model with photographs. I took photos from the site Vaunut.org.
1. Another vessel is added and the undercar box is determined to have two lids. Now it looks finished. In addition, the vessels have drain valves, which I will simulate with 0.3 wire. I made the holes for them. I realized what these “wings” were on the vessels – in reality these were sheets of metal that protected the valves from stones lifted by the air flow. I didn't make them in the model. I'll have to make them with thin sheet copper, I'll try, but I don't know if I can. 2. Looking at the structure behind the front bogie of the trailer car, I came to the conclusion that it might look something like this. The four legs are, of course, a bit thick, but this is a cost of scale; in fact, they are a millimeter in diameter, or it is nesessary to make the entire structure from etched copper, but this is still difficult for me. I'll try this first so, let's see how it looks, hopefully will look better as in the 3D-model. 3. I came to the conclusion that the cylinder behind the front bogie of the motor car was installed incorrectly, so I moved it. In addition, there was exactly the same cylinder near the rear bogie. Near these cylinders there are some structural elements that can be seen from under the body. I tried to imitate them as they appear in videos and photographs. 4. Helps to your photo it was possible to establish that there was also some kind of “mushroom” next to the vessel. I imitated him too. 5. After playing with the contrast, colors and levels of this photograph, I came to the conclusion that the motor car had structures with inclined beams not only under the first doors, but also under the second ones. During the reconstruction, it seems that the rear beam was removed and instead they made a flat and not beveled end of the underbody frame. So I saw it in the video. For now, since the model imitates the red and yellow version of the train (original version), I made it as in your photo, with a bevel. 6. In addition, videos make it possible to install additional boxes that were not noticeable before. I checked the geometry in the model; they do not interfere with the operation of the couplings and the turning of the bogies. Now the model has been brought to such a state that if you look at it from the side, the undercar equipment looks correct, but if the model is turned over, then, of course, the bottom remains smooth…
I will be away for the entire next week, including this and next weekend and will probably no anwer here.
Sinulla ei ole tarvittavia oikeuksia nähdäksesi tämän viestin liitetiedostoja.